Brusho with MFT Space Explorer

Today is Day 3 of the 30 day coloring challenge and I am still with it. This is so much fun!


Today I have created a pair of cards with a background created with Brusho color crystals. These are fairly new to me and I may have applied too many crystals. The colors are so vibrant I keep forgetting less is more. But then, space is pretty dark, isn't it?


I am a big fan of sparkle and shimmer, so after I shook out the paint crystals onto Tim Holtz watercolor paper, I spritzed the paper with Psst Shimmer Sparkle. It's difficult to see in the photos, but it adds a lovely shine to the paper.


I added the stars with a white pen. The spacemen and planets were colored with Copics.


I love these little guys and will be sure to use them again and again. I think next I will try to create a moon for them to be standing on.

        STAMPS: MFT Space Explorer
        PAPERS: Tim Holtz Watercolor, MFT Smooth White, After Midnight, Timber Green
        INKS: MFT Licorice Black Hybrid, Brusho Color Crystals, Psst Shimmer Sparkle spray, Pitt Artist Pen-white, Copic markers
        DIES: MFT Space Explorer, MFT Rounded Rectangle Frames, MFT Blueprint 27


Copic No-Line Coloring

Day 2 of the 30 Day coloring changes and I pulled out the Copics today.  I have always admired the no-line coloring I have seen and decided there was no time like the present to give it a try. I had just gotten a shipment of the new Penny Black stamps and dies from their Bliss catalog. Love....

I chose the Awaken cling stamp for my project and for a first attempt I was pretty pleased. It took forever, but it could have been because I was watching a few episodes of The Crown on Netflix at the same time.


To do justice to the image, this card is 5" x 7".

It feels nice to be coloring something spring-like. Are you tired of the grayness of winter too?

Here's a close-up:


This is definitely going to become a favorite technique. There is nothing like sitting and happily coloring to improve my mood.

STAMPS: Penny Black Awaken and Happy Thoughts (Sentiment)
PAPERS:  Xpress-It Blending card; MFT Green room & whip cream
INKS:  MFT grout gray hybrid & chocolate brown dye; Copic markers:
          Flowers: Y32, YR12, YR15, YR16, YR18, YR21
            Stems: YG13, YG17
            Sky: B000
            Centers: E27, E59
OTHER:  28 Lilac Lane Spring Butterfly sequins


30 Day Coloring Challenge - Coloring with Pencils

Today is Day 1 of the 30 Day Coloring Challenge on Kathy's The Daily Marker blog. I'm not sure if I can keep up, but it's a great incentive to play.

Today I decided to try my hand with coloring with colored pencils. I just got a great set of Prismacolor Premier pencils that I haven't had a chance to use.


I made this cute card to send to my daughter. As a first attempt with the pencils, it didn't come out too badly, but I learned afterwards I would have more success with layering the colors on a paper with more tooth. Another lesson learned. I will be back at the coloring board soon for another attempt with the pencils. I definitely like them and want to improve.

STAMPS: Newton's Nook - Pug Hugs
PAPERS: MFT Smooth White & Biscotti; Lawn Fawn Hello Sunshine
INKS:  Prismacolor Premier pencils; Memento Black Tuxedo; MFT Cherry Crisp
DIES: MFT Blueprints 14; Simon Says Stamp Stitched Circles
OTHER: Glossy accents; Nuvo crystal drops

Layered Heart

Happy Saturday. It looks like we may get a wee bit of warmth today - double digits!

I have another Valentine for you today made with an awesome new Caprice Heart Layers die I just splurged on. It's from Birch Press, part of the Memory Box family. It is really a combination of 3 dies meant to be layered. I used MFT Cotton Candy, Ripe Raspberry and Cherry Crisp cardstocks to build the heart. Isn't it awesome?


I think it would look great in monochromatic color too. I'll try that next. The Hey Love sentiment die comes from Simon Says Stamp.

The card base is MFT Sweet Tooth and the patterned paper is Kaisercraft North Pole. I was excited to be able to use some Christmas paper on a non-Christmas card. I decorated the edge with a strip of pink glitter washi tape.

Inside I used some of the scraps from cutting the die for a little flower decoration. I stamped the sentiment from Penny Black Forever and Always in MFT Wild Cherry ink.

I am hoping to get to my craft room today, but I have a bunch of chores to do. Tomorrow you may see a Christmas card I never got posted if I can't make something new. Stop back and check in!


Stacked Hearts

I guess you noticed I haven't been around for awhile. I was on vacation in Oregon for a few weeks and then upon my return went straight into surgery for a hip replacement. I am overjoyed to report that I am 150% now and glad to be creating agin. In fact, I have a backlog of cards to share, so come back often.

I made this card for a challenge on a Facebook group I belong too. It will be for my husband on Valentine's Day because he HATES pink. Hmmm, I should make him another card in various shades of pink just to be evil.


I created the background using Brusho on cold press watercolor paper. Instead of spritzing with water, I used Pssst Sparkle Shimmer spray and oh how gorgeous that is. Unfortunately, it just doesn't show up very well in the photograph. I have to get a better photography set-up.

Next I die cut Simon Says Stamp's Stacked Hearts die from MFT's Sweet Tooth cardstock and adhered with Ranger Matte Medium. The sentiment is MFT Essential Sentiments set, stamped with Versamark and embossed with Ranger white detail powder on MFT Black Licorice. The paper was then diecut tih MFT Stitched Sentiment Strips.

Inside I just stamped a beautiful sentiment from Penny Black in the Forever and Always clear set. I used MFT's Blue Lagoon ink. I am so much more confident stamping the larger sentiments now that I have a MISTI. Love it.


Well that's it for today. Come back tomorrow as I catch up on my posting.


Lighted Haunted House

Seems like I have been sharing a lot of my experiments with you lately, none of which have gone exactly as I would have liked. Today is no exception as I bring you my first venture into using Chibi Lights. I learned a lot while making this card, and I will share with those of you who may be thinking of venturing into electrifying your cards. But first, let me present the card in question:

UNLIT:


The scene was constructed mainly using the Taylored Expression Haunted Cover Plate die with detail that are listed below. I constructed a simple circuit using the battery, bulb and foil tape that comes in the Chibitronics introductory kit. 

LIGHTED:


It looks really cool, but it was an effort to get here! It took two attempts, but I learned:

1. Make sure the tape is as smooth as it can be, especially in the bends you have to make, but don't smooth too hard or you will break the tape and therefor the circuit.
2. Make a nice pen for your battery to sit in so it doesn't slide around after you get all your card pieces put together.
3. Be careful of the foam tape you use to attach your card front. Mine was too thick and it looked awful. I disguised it by making a frame of washi tape, but I am not happy with the way it looks.

Other than that, this was a fun, albeit expensive card.

MATERIALS:
PAPERS: MFT card stock in Black Licorice, Cement Gray, Orange Zest, Smooth White, White Vellum, Periwinkle, Stone Gray. Yellow vellum from my stash.
STAMPS: Papertry Ink Full Moon, MFT Grave Situation
DIES: Taylored Expressions Haunted Cover Plate; MFT Grave Situation; Memory Box Swirl Ghosts; Simon Says Stamp Stitched Circles; Impression Obsession Pumpkin Patch
INK: MFT Black licorice & Pineapple
OTHER: Doodlebug Washi; Chibi Lights

What could be spookier than a haunted house with lights flickering on Halloween night?

I think today I am going to go back to basics and put together some cards in my comfort zone. Then again... 

Be sure to some back and see what I will come up with next in my studio.


Pumpkin Truck

As I have mentioned before, I have been trying to teach myself how to watercolor. I made this card for my husband for our anniversary in a few weeks. I think I'm getting better, but still have so far to go. This is a case of Mimi Jourdain from the Penny Black design team. She is amazing. Her card was also the cover for the Penny Black autumn release. 


Stamps: Penny Black Pumpkin Truck, Penny Black Snowy Grove, Penny Black Autumn Splendor
Papers: Strathmore Hot Press watercolor paper, MFT Milk chocolate and Kraft
Inks: Tombow markers, Inktense pencils, Distress Inks, VersaFine Onyx Black

I won't show you the inside of this one because it's got all sorts of mushy stuff in it! LOL

Have a great Saturday. It's going to rain today and I have some new stamps in the house, so guess where I will be!


Autumn Thanks

Just a quick post this evening. It's been raining all day, which for some reason made me want to pull my studio apart and rearrange. Sometimes I baffle myself. Anyway, I have to go put it back together.

This is a Thank You card I made while experimenting with the new Hero Arts Autumn Ombre ink pad. I need more practice, but I am loving it.


This card was made with the Patterned Leaf stamp from Impress. It was stamped on MFT Smooth White, which was cut down and adhered to a mirror gold panel from Bazzil.


The sentiment is a Memory Box die which was cut twice - once from the gold paper and once from MFT Eggplant. The two die cuts were slightly offset to add more definition. All were adhered to an MFT Sweet Tooth card base. The splatters were added with Distress inks - Wild Honey and Ripe Persimmon.


I added a sentiment from MFT's Kind Thanks to the inside, stamping with the Autumn Ombre pad.

Thanks for stopping by today and I hope it's not as chilly and wet where you are.


I Love Fall

Truly, Fall is my favorite season and I love crafting with the fall color palette. Today's card is full of texture and the autumn spirit.


The card base is MFT Milk Chocolate and the panel is MFT Biscotti. I used Simon Says Stamp Stitched Whirl die on the panel. To me it represented the swirl of wind blowing the fall leaves around.

Concord and 9th Layering Leaves die cuts were used for the "bouquet" of leaves. In addition to the colors already mentioned, I used MFT Jellybean Green, Orange Fizz and Kraft.

The tag was cut from using MFT Tag Blueprint #4 and the sentiment from Concord & 9th Give Thanks stamp set was stamped in Versamark and embossed with Hero Arts Brass embossing powder. I love, love LOVE that powder! The leaf bunch was gathered with a piece of twine.

On the inside, I used another Biscotti panel and decorated it with several cut out leaves from the Layering Leaves. I love how this card came out. To me, it represents fall and the harvest season.

Thanks for stopping by today, and I hope to see you again tomorrow. I will be experimenting with my new Hero Arts Autumn ombre ink pad.


Cozy Holiday

Hello! I don't know where you are, but it is a gorgeous fall day here. The sky is so incredibly blue, it looks like it was Photoshopped. 

I haven't done many holiday projects yet, but with the wonderful products coming out now it is hard to wait. This was a pretty quick and easy card using the Hero Arts Coffee Cup Tags stamp set.

After I had stamped the images in MFT Wild Cherry and Dill Pickle dye inks, I decided the whipped cream topping on the green cup needed some pizzazz so I slathered on some Finnabar Snowflake Paste. Huge mistake as it made the dye ink run a bit. Duh. I like to think it's the mint flavoring showing, right?

The sentiment was stamped in MFT Black Licorice onto Whip Cream cardstock, which was also used for the card base. I used MFT Blueprint #15 to cut the MFT Wild Cherry and Lawn Fawn Christmas Plaid layers. As a finishing touch I adhered the holly and poinsettia stickers from Little B onto the cups.

Now that is two Christmas cards done and who-knows-how-many to go. I actually have a very small family and few of my friends exchange cards, but I send them a homemade card anyway. Do  you make a lot of cards?

Be back tomorrow with an autumn creation using Concord and 9th. See you then.


Llama Love - MFT Color Challenge

Wow! Where does the time go. I knew I was busy and ignoring my blog, but I didn't realize it had been a month. At least I wasn't ignoring the card making, so I have lots to share with you in the next few days. I have been experimenting in different water coloring techniques trying to find what works for me - with mixed results. I will be sharing some of those projects later this week,

Today's card was my interpretation of My Favorite Things' Color Challenge #53. 


I made this card for my daughter. Hope she doesn't pop into the blog!


As you can see, this is one of my water coloring attempts, this time with Zig clean color markers. I began by cutting the inside rectangles with MFT's Blueprints 29 from watercolor paper. Then I stamped the images from MFT's Llama Love set with Versamark ink and embossing with black powder. Because the images were relatively small, I wanted the embossing to help control the travel of the water colors. I then colored them with the Zigs and used a waterbrush to blend the colors. I left the llama's colors kind of random to look more like fur.


Next I cut the rest of the pieces for the card also using Blueprint 29. I used MFT Kraft cardstock for the base,  and MFT Coral Crush and Cactus for the panel and frame. I stamped the sentiment on Gravel Gray with Versamark and used white to emboss this time.


I stamped another sentiment on the inside with Black Licorice ink and finished it off with another llama image. I love the sentiments in this set - so clever.

So there you have it - a card completed for a challenge on time and that will actually get put in the mail this week. I am just soooo prolific at making cards, but mailing them is just another story. I am trying to improve my record.

Do you get your cards mailed, or do you collect them? Sometimes it's hard to part with if I really love how it turned out, but I need to get over that.

Have a great day and see you tomorrow with another card or two.


Shadow Stamping

Well,ladies and gentlemen. I watched Stephanie's amazing video and though, I can do this! Guess what, I really can't. It is obvious I need a lot more practice. Take my MISTI away from me, and I'm lost. But as out of place as many of these stamps are, I still like the result. But maybe that's because your baby is always the cutest baby in the world.


So it's pretty obvious I CASEd Stephanie's layout, using Tropical Flowers. I used Coral Crush and In the Buff card stocks and Coral Crush and Hero Arts Unicorn inks. I die cut the Hello from Hello There in white adhesive-back fun foam. Give dimension and makes life easy. I am one of those people that can't line things up properly (i.e. the detail stamps above).

I added a few sequins from 28 Lilac Lane and some clear Wink of Stella to the sentiment. Love the shine it all gives.


So there we have it. I have earned my last badge.


I am going to miss this summer camp. It has been incredibly fun and I have learned a lot. And I promise, I will practice my shadow stamping until I get it right!


It's a Jungle Out There

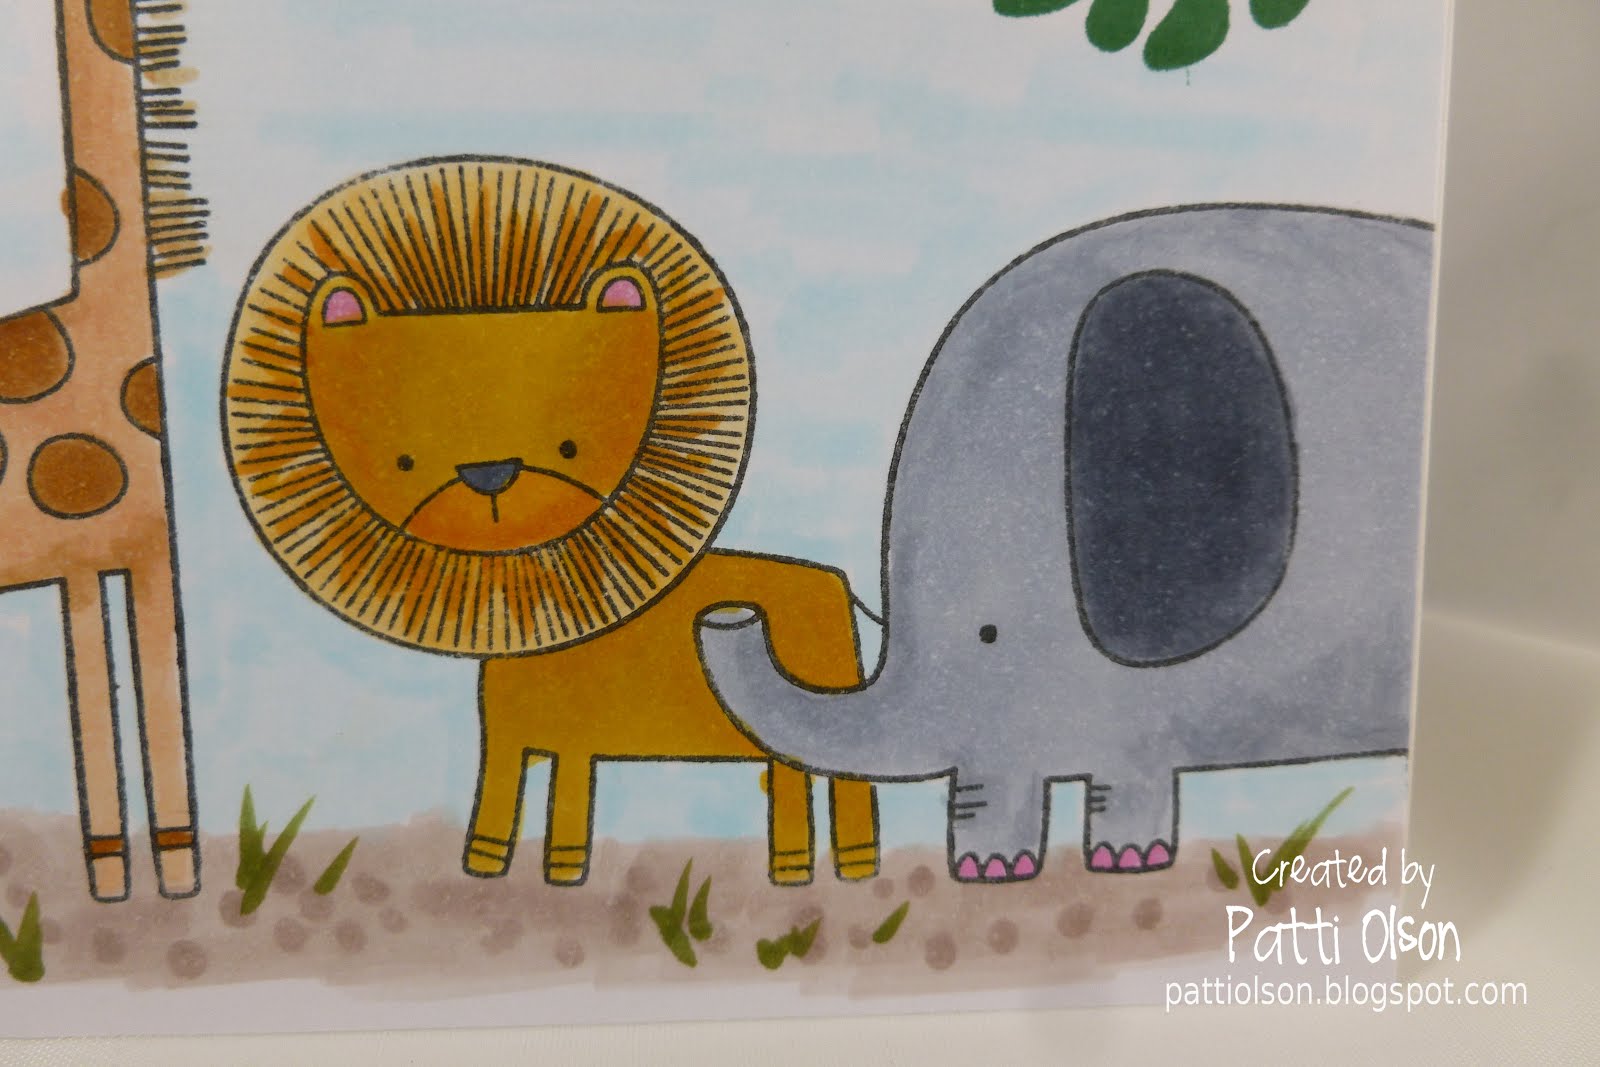
I had a few days "off" to work on my studio some more. I must have hauled up hundred of pounds of paper (I print EVERYTHING out; gotta stop) and old magazines to the recycle bin. No need for the gym this weekend. As a result I am a little behind on my camp challenges but I was able to get caught up. This first post is for the masking challenge at the Thursday night bonfire. This was so much fun. The hardest thing was deciding which stamp set to use. I finally settled on Sweet Safari and then added Tropical Flowers and Jungle Friends to build my scene. Now the reason I went into deep cleaning mode in the studio was because I couldn't find my masking paper! Hubby came to the rescue with full sticky-back post-it notes.  I still haven't found my brand-new pack of masking paper! Last saw it when I did something in Flashy Florals. Oh well.


I put the elephant and giraffe in the foreground as well as the lighter green leaf. The animals were all stamped with Black Licorice Hybrid and the leaves in Dill Pickle and Elf Green. I colored the animals with Copic markers - cool grays for the elephant, warm grays for the zebra, YRs for the lion and Es for the giraffe. I colored the Serengeti with gray/browns and added just a wee bit of blue for the sky. I flicked a couple of sprigs of grass for the vegetarians among them to eat.


Check out the pedicure on the elephant!


The next time I decide to put an animal out front I will check the size of their tail. That mask was a challenge, but in hind sight it may not have even been necessary.

I used Xpress blending cards and Sweet Tooth card stock for the card base.

And here is my bonfire night badge:


This was fun and I love this card. So playful.

One more challenge left and all my camp classes are done for this session of camp!


Twinkle in a Tangle

Don't scream, but here I am with my first Christmas card of the year. EEK! I would have waited, but I am playing with the Art Impressions Challenge #190 which is called Glitter and Shimmer. Now, I probably could have selected another stamp to use, but I got this cutie last Christmas and never had a chance to ink it up. And with all those Christmas lights calling out for glimmer,how could I not choose Twinkle in a Tangle?


Aren't they just an adorable couple standing under the mistletoe? I imagined that Mrs. Claus was in the kitchen making dinner when Santa snuck up on her after coming in from a day in the workshop. He was wearing his jeans and a comfy red flannel shirt.

I stamp the Art Impressions Twinkle in a Tangle image onto Xpress Blending cardstock with Memento Tuxedo black ink and colored the couple wit Copic markers, leaving the light bulbs uncolored at first. Then I went back and colored in the lights with Kirarina Wink markers for glittery shine. I stamped the sentiment with Versamark ink and heat embossed with Ranger silver detail embossing powder. There is a touch of Wink of Luna silver on Mrs. Claus's earring and glossy accents on her eyeglasses.

But is this enough glitter and glimmer? Nooooo! I put the card together using My Favorite Things Blueprint 15 dies and MFT Card stock in Cherry Crisp and Dill Pickle. The silver glitter paper is from Stampin' Up! I thought it needed something else to bring even more attention to the image panel so I added a slim strip of foiled washi tape from Little B.

I just wish the photo showed all the glimmer and shine!


When do you start making Christmas cards? It is kind of fun making something for the cold season when it it broiling hot and humid outside.

Fun Filled Day

Wow - two months off from blogging has given me whole new outlook and my mojo is raging. Today I am playing with the Simon Says Stamp Wednesday Challenge. The challenge is called "Let's Go Wild" and they are showcasing W Plus 9 products. Check and check - here we go!

Dave my Mail Carrier brought me a package the other day with some of the new W Plus 9 products. Let me tell you, I am in LOVE with these stamps. They are adorable. I am so much in love, that I decided to try watercoloring again. This is NOT my strong suit, let me tell you. But I am rather pleased with the results.


STAMPS: W Plus 9 Curious Forest Friends, Forest Friends
PAPERS: Canson Bristol, MFT Blue Breeze
INKS: Versafine Sepia, Majestic Blue, Derwent Inktense Pencils, Copics
OTHER: Pretty Pink Posh Summer Mix

Thanks for stopping by. I'm going back into my studio and play with these great stamps some more.