Well,ladies and gentlemen. I watched Stephanie's amazing video and though, I can do this! Guess what, I really can't. It is obvious I need a lot more practice. Take my MISTI away from me, and I'm lost. But as out of place as many of these stamps are, I still like the result. But maybe that's because your baby is always the cutest baby in the world.
So it's pretty obvious I CASEd Stephanie's layout, using Tropical Flowers. I used Coral Crush and In the Buff card stocks and Coral Crush and Hero Arts Unicorn inks. I die cut the Hello from Hello There in white adhesive-back fun foam. Give dimension and makes life easy. I am one of those people that can't line things up properly (i.e. the detail stamps above).
I added a few sequins from 28 Lilac Lane and some clear Wink of Stella to the sentiment. Love the shine it all gives.
So there we have it. I have earned my last badge.
I am going to miss this summer camp. It has been incredibly fun and I have learned a lot. And I promise, I will practice my shadow stamping until I get it right!
It's a Jungle Out There
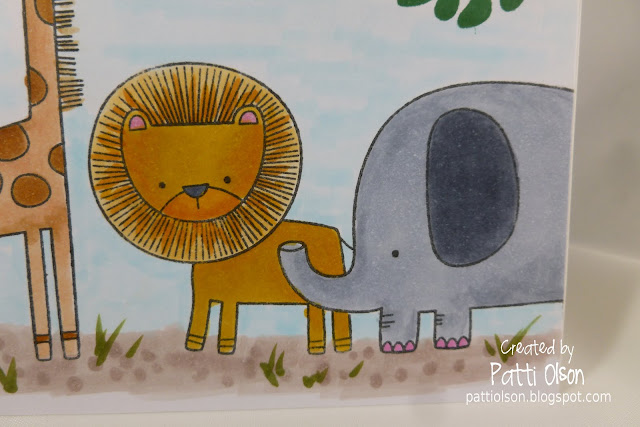
I had a few days "off" to work on my studio some more. I must have hauled up hundred of pounds of paper (I print EVERYTHING out; gotta stop) and old magazines to the recycle bin. No need for the gym this weekend. As a result I am a little behind on my camp challenges but I was able to get caught up. This first post is for the masking challenge at the Thursday night bonfire. This was so much fun. The hardest thing was deciding which stamp set to use. I finally settled on Sweet Safari and then added Tropical Flowers and Jungle Friends to build my scene. Now the reason I went into deep cleaning mode in the studio was because I couldn't find my masking paper! Hubby came to the rescue with full sticky-back post-it notes. I still haven't found my brand-new pack of masking paper! Last saw it when I did something in Flashy Florals. Oh well.
I put the elephant and giraffe in the foreground as well as the lighter green leaf. The animals were all stamped with Black Licorice Hybrid and the leaves in Dill Pickle and Elf Green. I colored the animals with Copic markers - cool grays for the elephant, warm grays for the zebra, YRs for the lion and Es for the giraffe. I colored the Serengeti with gray/browns and added just a wee bit of blue for the sky. I flicked a couple of sprigs of grass for the vegetarians among them to eat.
Check out the pedicure on the elephant!
The next time I decide to put an animal out front I will check the size of their tail. That mask was a challenge, but in hind sight it may not have even been necessary.
I used Xpress blending cards and Sweet Tooth card stock for the card base.
And here is my bonfire night badge:
This was fun and I love this card. So playful.
One more challenge left and all my camp classes are done for this session of camp!
Twinkle in a Tangle
Thursday, August 11, 2016
Don't scream, but here I am with my first Christmas card of the year. EEK! I would have waited, but I am playing with the Art Impressions Challenge #190 which is called Glitter and Shimmer. Now, I probably could have selected another stamp to use, but I got this cutie last Christmas and never had a chance to ink it up. And with all those Christmas lights calling out for glimmer,how could I not choose Twinkle in a Tangle?
Aren't they just an adorable couple standing under the mistletoe? I imagined that Mrs. Claus was in the kitchen making dinner when Santa snuck up on her after coming in from a day in the workshop. He was wearing his jeans and a comfy red flannel shirt.
I stamp the Art Impressions Twinkle in a Tangle image onto Xpress Blending cardstock with Memento Tuxedo black ink and colored the couple wit Copic markers, leaving the light bulbs uncolored at first. Then I went back and colored in the lights with Kirarina Wink markers for glittery shine. I stamped the sentiment with Versamark ink and heat embossed with Ranger silver detail embossing powder. There is a touch of Wink of Luna silver on Mrs. Claus's earring and glossy accents on her eyeglasses.
But is this enough glitter and glimmer? Nooooo! I put the card together using My Favorite Things Blueprint 15 dies and MFT Card stock in Cherry Crisp and Dill Pickle. The silver glitter paper is from Stampin' Up! I thought it needed something else to bring even more attention to the image panel so I added a slim strip of foiled washi tape from Little B.
I just wish the photo showed all the glimmer and shine!
When do you start making Christmas cards? It is kind of fun making something for the cold season when it it broiling hot and humid outside.
Fun Filled Day
Wow - two months off from blogging has given me whole new outlook and my mojo is raging. Today I am playing with the Simon Says Stamp Wednesday Challenge. The challenge is called "Let's Go Wild" and they are showcasing W Plus 9 products. Check and check - here we go!
Dave my Mail Carrier brought me a package the other day with some of the new W Plus 9 products. Let me tell you, I am in LOVE with these stamps. They are adorable. I am so much in love, that I decided to try watercoloring again. This is NOT my strong suit, let me tell you. But I am rather pleased with the results.
STAMPS: W Plus 9 Curious Forest Friends, Forest Friends
PAPERS: Canson Bristol, MFT Blue Breeze
INKS: Versafine Sepia, Majestic Blue, Derwent Inktense Pencils, Copics
OTHER: Pretty Pink Posh Summer Mix
Thanks for stopping by. I'm going back into my studio and play with these great stamps some more.
Grateful
Today is Day 4 of MFT's Camp Create and our craft today is dry embossing using our dies. This was a new craft for me, and this is what I came up with:
I used MFT's Layered Leaves dies for the embossing. It is difficult to catch in photos, but it came out fairly well. The open dies did better than the closed leaves. Maybe I should have used more shimming?
Here is a closer look:
All in all, I think this is an interesting technique to add into my repertoire.
Here's the total recipe -
(All items are MFT)
PAPERS: Cool Cucumber, Persimmon, Limeade
DIES: Layered Leaves, Grateful, Blueprint 29
STAMPS: Gratitude for You (inside)
INK: Black Licorice
A quick look at the inside of the card. I might go back and add a leaf or two.
And last, but not least, my BADGE!
See you tomorrow for the final day of camp crafts!
Camp Create Resist
Wednesday, August 10, 2016
Today's craft at Camp Create was Remarkable Resist. This is one of my favorite techniques. Today I decided to go big and created an 5.5" x 5.5" card using the beautiful Bountiful Blooms background stamp.
I inked up the stamp with Versamark ink and stamped onto Smooth White card stock. Then I embossed with clear embossing powder and heat set it. Next I sponged on Distress Inks in Spun Sugar, Abandoned Coral, Wild Honey. Milled Lavender, and a dash of mowed lawn. I thought I had too many colors so I did a little more blending with the spun sugar and it seemed to calm things down a little bit without muddying the colors.
I cut the stamped panel down to 5" x 5" and adhered to a 5.5" x 5.5" card base of Elf Green. I also cut a strip for the sentiment from elf green with the bottom part of the Essential Cover-up - Vertical die which fit the sentiment from Kind Thanks I wanted to use. Stamped the sentiment in VersaMark, embossed in white this time and the card was ready to finish. All I did for embellishment was to add some clean droplets from Pretty pink Posh.
And that is my camp project for today, and now I have this badge to show for it:
See you all tomorrow with whatever the latest technique will be!
Ridiculously Awesome
Tuesday, August 9, 2016
Howdy, fellow campers. Unbelievably I actually completed my craft project on the day it was introduced for the second day in a row. Amazing,
And speaking of Amazing, that is one of the stamp sets I decided to use on today's project - Awesome Ombre. I was excited because it gave me a chance to try out my new Clarity brushes. Let me tell you - another Amazing! Love them. Spendy, but worth it. And they clean up so easily.
For the ombre part of my card, I created a panel in Sweet Tooth by cutting it with a Blueprint 29 stitched die. Then starting at the bottom right and top left corners, I brushed on Limelight Ink, then switched to Sour Apple as I moved toward the middle on a diagonal and finished by applying Green Room in the center. It's kind of hard to photograph how well it turned out. I had decided to use the Monster Love stamps and dies, but I wanted a die cut sentiment, so I used Amazing and did an ombre ink application on it with Periwinkle and Grape Jelly inks. After cutting my Stitched Triple Peek-a-Boo Window and a piece of Boysenberry Tiny Dots patterned paper to back the windows, I glued down the sentiment and let it sit to dry under an acrylic block.
While the glue was drying I went to working stamping my monsters. They are so stinking fun to work with. Funny, I almost didn't get this set, but it is quickly becoming a favorite. It's just so versatile and fun! I stamped three monsters in Daffodil, Orange Fizz, and Summer Splash inks and the facial details in Black Licorice. The mini-MISTI tool makes it all so much easier!
When the monsters were all stamped on Smooth White, I used the matching dies to cut them out and arranged them in the peek-a-boo windows. I adhered everything in its place on a Boysenberry card base and added a few enamel stickers from Stampin' Up!. I finished off with a coat of clear Sakura Glaze marker on the eyes and Clear Wink of Stella on the sentiment.
I think this came out ridiculously amazingly cute even though the ombre looks a little mellow in the photos. I enjoyed the lesson and creating an ombre card. I think it is a technique I will be using often.
See you all tomorrow! Thanks for popping in. (NOTE: all items in italics are from My Favorite Things).
And here is my badge:
MFT Camp Create - Fangs a Lot!
Monday, August 8, 2016
Well, Hallelujah - I have finally gotten my studio in good enough shape to actually craft a card. And good thing too, because the third session of MFT's Camp Create started today. I missed the whole second sessions due to my purging, moving, and organizing. There's still a lot to do, but at least I can find my paper cutter, papers and inks and most importantly, the top of my desk.
Today's challenge is to create a monochromatic card. This is not easy for me because I LOVE color - and lots of it. But I guess that's why they call it a challenge. The first step was to pick a color to work with, and I looked around my studio and my eyes fell on my accent wall:
So that was easy - purple it would be. Now what set to use? Thanks to the USPS and delivery this weekend, I had plenty of new goodies to choose from. So here is my creation for Day 1:
I hope the gray and black don't count against the monochromatic theme, but I think Dracula looks rather stylin' in his purple garb. This card is perfect too for a trip we have planned this fall. Some very generous friends have offered to host us at their home in Oregon and we will be there at Halloween. BAM - one thank you card done!
STAMPS: MFT Whimsical Waves Background; MFT Frightful Friends
PAPERS (All MFT)" Stone gray, Periwinkle, Boysenberry, Smooth White
DIES: MFT Frightful Friends; Essential Cover-Up Vertical
INKS: MFT - Grape Jelly, Boysenberry, Black Licorice, Purple Rain; Copic markers C06, C09, BV0000, BV00, BV01, V15, V17; Sakura clear glaze marker for eyes
OTHER: Sequins from Lucy's Little Things - Boo (purple); bat sequins from my stash.
And here is the badge I earned today:
Hopefully I will see you tomorrow. I am going back into the studio to play tonight after dinner. This is so much fun!
Subscribe to:
Posts (Atom)